Throughout the last year, I’ve gotten into the habit of carrying around analuminum briefcase wherever I go. Not only has the briefcase become part of my uniform, but it feels practical, allowing me to carry my laptop, chargers, medicine, snacks, and even a change of clothes with me at all times. It feels more organized than carrying everything in a tote bag (as I used to), and it feels more professional than lugging around a backpack.
In spite of its practical and stylistic advantages, the briefcase has introduced new problems into my daily lifestyle. Problems with the original aluminum briefcase include the following:
- The interior is completely hollow, so unless the laptop were padded by other items (e.g. clothing or snacks), it would rattle around inside.
- The briefcase is deep enough that working on the laptop while inside the briefcase is difficult; the sides were are high for wrists to rest comfortably while typing or scrolling.
- The briefcase does not fit comfortably into any rolling luggage, making air travel cumbersome and expensive (I’d have to pay extra to take both a briefcase and a separate suitcase on a flight)
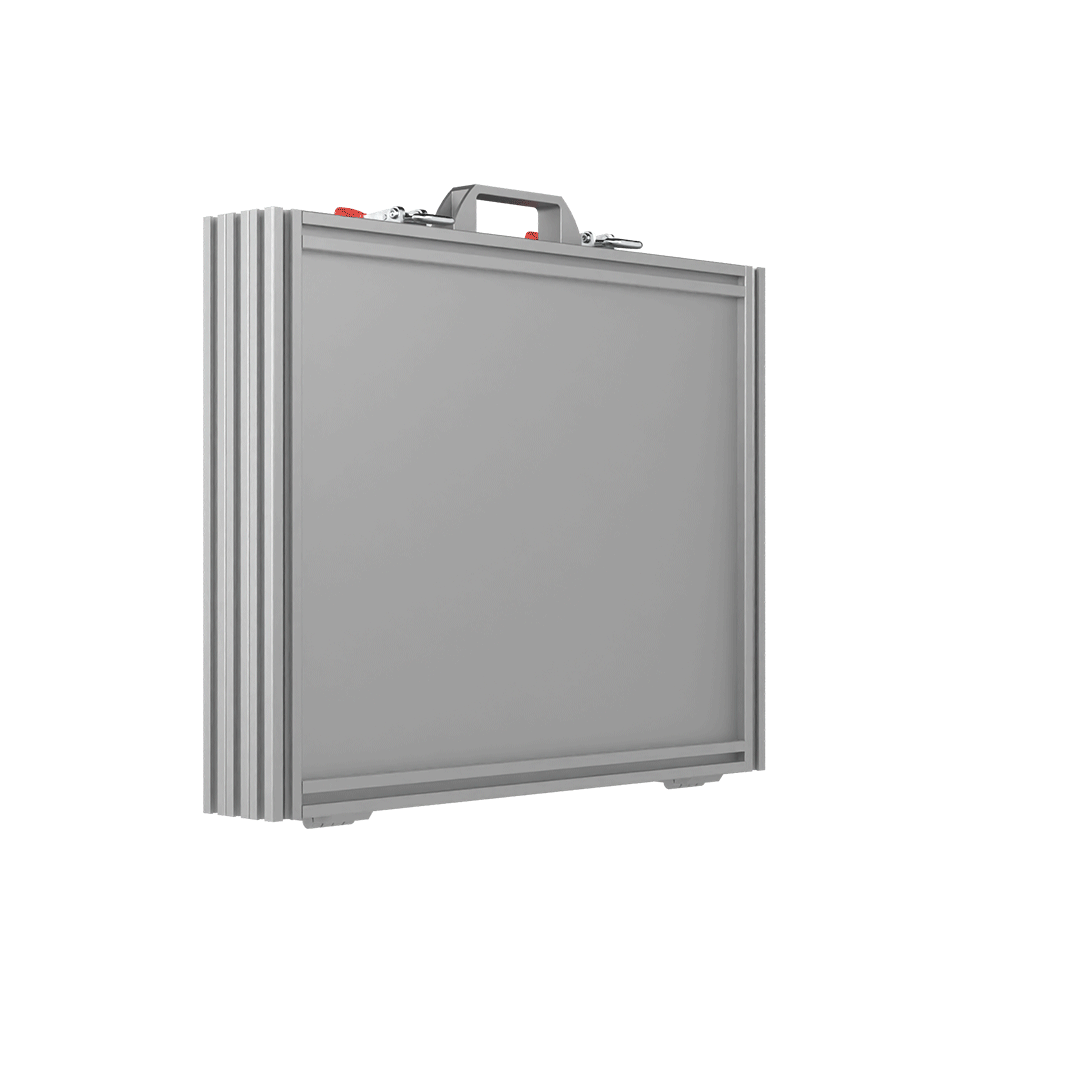
- The briefcase features a unibody design; if one part of the aluminum gets scratched or dented, the only solution is to purchase an entirely new briefcase.
- The aluminum is entirely anodized, which, though attractive, further reduces the repairability of the briefcase. It is difficult to sand or polish out scratches and dents from anodized aluminum, while, with raw aluminum, polishing and sanding is relatively straightforward.
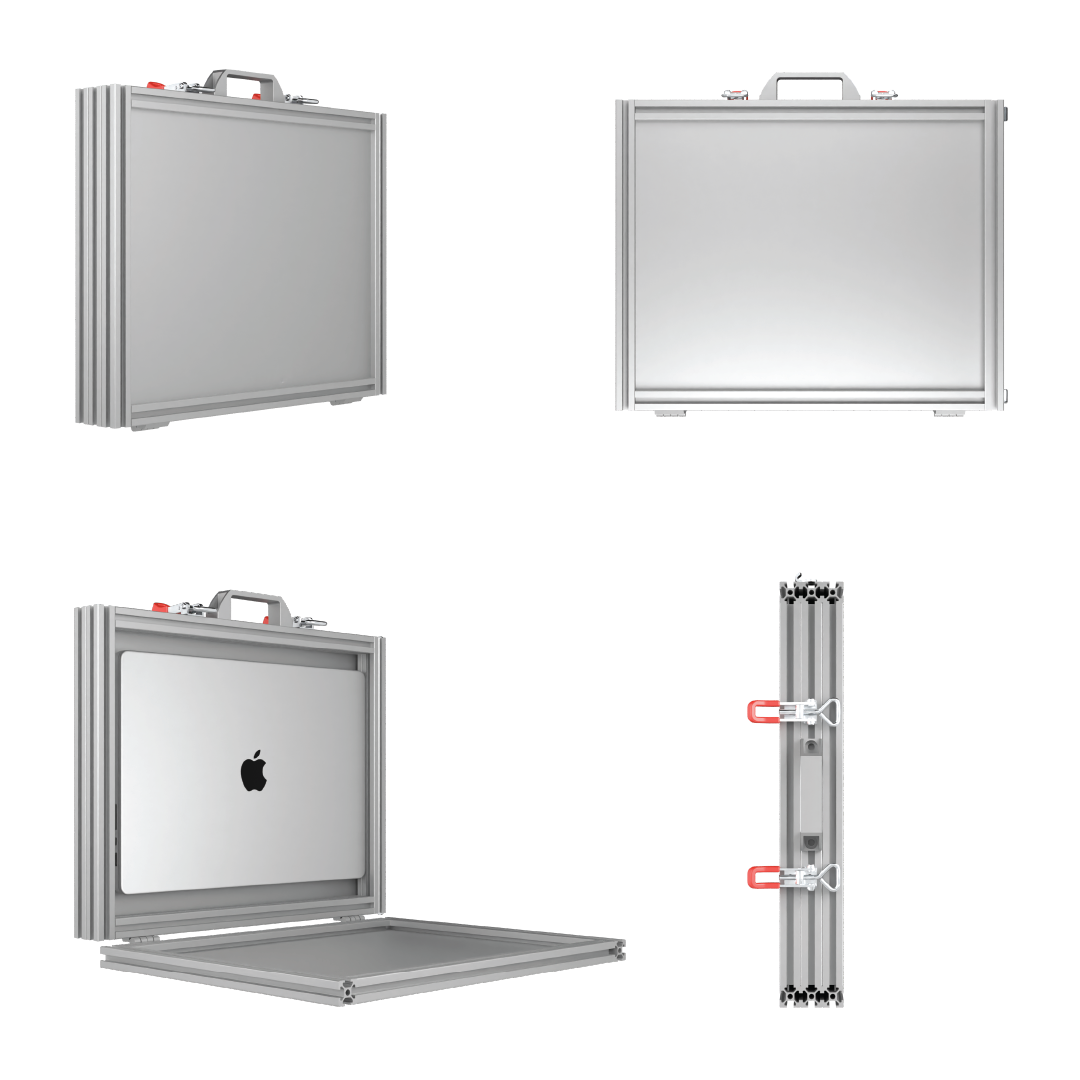
I loved the all-aluminum design of the original briefcase. It matched with my other silver devices and looked clean on top of all-black clothing. I wanted to preserve a mainly-aluminum build in the new design.
Though my modular luggage system features a mostly-aluminum design, I made notable changes to the build and finish of the aluminum. Firstly, instead of designing a unibody briefcase from one sheet of aluminum, I mainly used 2020 (20mm x 20mm) aluminum extrusions, a popular style of aluminum beam used in small-scale construction. These beams helped me build a briefcase that is structurally rigid while entirely de-constructable. If any beam endures significant damage, the beam can be easily replaced, allowing for less wasteful and more cost-efficient luggage. Each beam is fastened using a corner bracket designed to be used with 2020 aluminum extrusions.
Additionally, I inserted raw aluminum panels into the grooves of the beams to cover the sides of the luggage. Because these panels are not anodized, any scratches and dents that the luggage may accumulate over time can be easily buffed out.
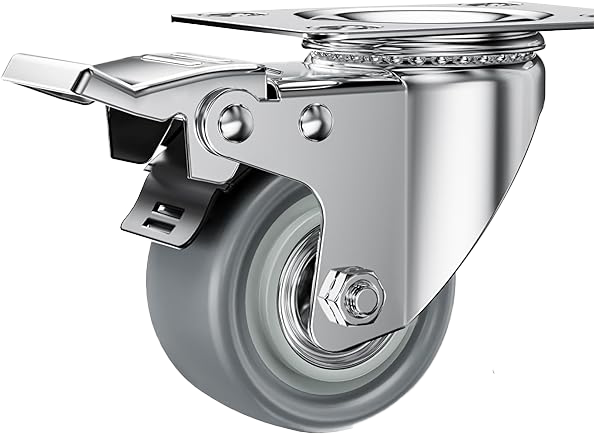
The wheel tray uses heavy-duty 50mm casters. These industrial-grade wheels are smooth, durable, and easily replaceable.
The components of the luggage system, as well as the lids of the chest and the briefcase, are held together with a set of toggle latches and catches.
The dimensions of the chest and briefcase, when secured together, measure 40 x 33 x 22cm. These dimensions measure just below the maximum dimensions of the under-seat area of a Boeing 737 (44 x 33 x 22cm) or Airbus A330 (45.72 x 40.64 x 27.94cm). This tight fit economizes on available storage while avoiding an extra charge for a carry-on item. The entire luggage system can be comfortably stored below an airplane seat.
The luggage system is split into three main components: a main chest, a briefcase, and a wheel tray. The main chest measures 40 x 32 x 16cm and uses a locking lid to store personal items such as clothing, snacks, and toiletries. The briefcase measures 40 x 32 x 60cm, designed for an exact fit with the 16” M1 Pro MacBook Pro, and closes via a locking lid. The wheel tray measures 32 x 22 x 9 cm and contains four caster wheels, allowing the luggage system to roll smoothly in all directions.
The briefcase was the first component to be built. The width of the briefcase measures 40cm, allowing 36cm of width on the interior –– the exact width of the 16” M1 Pro MacBook Pro that I use for all of my work. This tight fit allowed the computer to sit snugly inside the briefcase, reducing some of the rattling and sliding that the laptop would endure in my previous briefcase. The height measures 32cm, allowing 28cm of interior height and allowing for an inch of clearance on either side, where the latches are fastened. This height provided enough room for the lid of the laptop to open and stretch back. Originally, I had planned a depth of 4cm –– the equivalent of two aluminum extrusions. However, this depth would have made storage of other items in the briefcase (e.g. chargers, cords, drives) difficult. The 6cm depth, the equivalent of three extrusions, allows the laptop to rest securely next to other small items stored in the briefcase.
After building the structure of the briefcase, I installed two 36 x 28 aluminum panels to cover the front and back. To prevent the rattling of these panels during movement, I inserted a rubber gasket between the panels and the grooves of the extrusions. I then added rubber strips to the sides of the interior to help further cushion the laptop, and drilled a hole in the side of the briefcase where the ports of the laptop are positioned, allowing for full access of the laptop’s ports while in
I then installed a handle, two latches to the top of the briefcase to ensure closure of the lid, and two catches on the right side of the briefcase exterior, where the latches of the chest can connect to the briefcase.
Compared to the briefcase, the construction of the chest was relatively straightforward. The chest’s main section, where clothing and other small items can be stored, was built using aluminum extrusions and five aluminum panels to cover the sides and bottom of the chest. The lid was built from aluminum extrusions and a sixth aluminum panel, secured to the rest of the chest with hinges specifically designed for the extrusions. All panels are fitted with as rubber gasket to reduce rattling between the panel and the extrusions.
The width and height of the chest match those of the briefcase, allowing the two components to line up seamlessly when fastened together. The chest features the maximum depth possible within the under-seat luggage dimensions constraints.
Originally, I had bolted four 1” casters directly onto the frame of the chest portion of the luggage. While the luggage remained within the dimensions of the under-seat area of the plane, such small wheels came with multiple drawbacks. Firstly, because the diameter of the wheels was so small, the entire suitcase would rumble violently when going over uneven terrain. If a bump was too harsh, part of the aluminum frame would scrape on the ground –– leading to gradual damage. Moreover, with the wheels directly attached to the chest area, there was an overhang where the briefcase connected to the front of the chest, leading to an unbalanced luggage system when rolling. Sometimes the entire set of luggage would tip over, even when standing idle, due to the unbalanced wheel system.
As a solution, I designed a removable wheel tray –– a separate component entirely –– to replace the bolted-on wheels. The wheel tray attaches to the chest via latches when the briefcase is attached. This separate component provides multiple practical advantages over directly bolting the wheels onto the frame. Firstly, because the tray is detachable, larger wheels can be accommodated (in this case, I use 50cm rugged casters) while the rest of the system (40 x 33 x 22cm) remains within the under-seat dimensions of the plane. At the gate, the wheel tray can be detached and stowed in a jacket, while the chest-briefcase portion can be measured. This system allows the luggage to avoid the carry-on charge.
Moreover, because the wheel tray is a separate component, the brackets on each wheel are more structurally reinforced. Previously, when the wheels were directly bolted onto the frame, only three of the four screw holes on each wheel bracket were filled; one screw hole extended beyond the beams under the chest and was not able to be screwed in. On the dedicated wheel tray, two extra beams are added on the sides, allowing all four holes in the wheel brackets to be screwed in.
Because of the all-aluminum design, the fully-assembled luggage system weighs approximately 20 pounds –– far heavier than most traditional luggage. This weight makes carrying the luggage system challenging. While rolling the luggage system on the ground may be easy because of the smooth ball-bearing casters, carrying the luggage up/down stairs or into a car has proven difficult. Furthermore, because the exposed edges of the aluminum extrusions are sharp, it is easy to acquire nicks on the skin or on clothing.
Though I had originally anticipated that the luggage would be inexpensive to build, the combination of purchasing a large quantity of aluminum extrusions, a large quantity of thick aluminum sheets, and hardware specifically designed to fit 2020 aluminum extrusions made this build more costly than I expected.
Although the cost of building this luggage system was higher than I anticipated, I predict that this luggage system will save money over time. Because the luggage is entirely modular –– meaning broken parts can be individually repaired –– I believe the luggage system will last longer than most other luggage, which may break every few years and require a replacement. This modularity makes the luggage more cost-effective and environmentally sustainable. Furthermore, as evidenced by brands like Rimowa or Apple, an all-aluminum design is timeless. I hope the design of this luggage will remain as tasteful as the designs of other brands that incorporate a full-aluminum design in their products, even decades from now.
Because of its modular, rigid design, the luggage system serves more purposes than standard luggage ordinarily would. Some of the system’s alternate functions include:
- A stool: The luggage’s rigidity allows the user to sit on top of the system when fully assembled. The casters allow the user to move quickly in any direction while seated, and the brakes on all four wheels allow the user to fix themself into one place
- A desktop computer: The grooves in the aluminum extrusions allow display cables to run from an external monitor directly into the laptop through the briefcase, without requiring the briefcase to be opened. This feature allows easy connection to external displays and peripherals.
- A small table: The squared design of the luggage allows small items to rest on top of the system when fully-assembled. This feature has proven especially useful for holding drinks and snacks while in transit.
Luggage System
Luggage System Assembly
Briefcase
Briefcase